

Losing important files on your Mac can be a disaster. One minute, your documents, photos or project files are there. And the next moment they’re gone. The panic is real whether it’s an accidental delete, a corrupted disk, or a crashed external drive. Here’s the good news: with the right Mac data recovery method, your files are not lost forever and are often still recoverable.
This guide explains the reasons behind Mac data loss, when to act immediately, and the exact steps to recover your files. We’ll also show you how to prevent this stressful situation from happening again.

Part 1: Mac Data Loss Is More Common Than You Think
Many Mac users believe that their systems are immune to data loss. That assumption isn’t quite right. While generally robust, data loss for various reasons still occurs on macOS.
Some of the most common causes include:
- Accidental deletion: You empty the Trash without noticing what’s inside, and important files are gone in a flash.
- Interrupted software updates: Incomplete updates can cause unexpected data issues.
- Disk corruption: Usually caused by improper ejections or sudden loss of power.
- External drives and USB risks: These are especially vulnerable because they’re moved between devices so often.
- Formatting mistakes: A single mistake can wipe out a partition in seconds.
- Aging hardware – Older SSDs and mechanical hard drives can fail unexpectedly.
- Physical Damage – Liquid damage, drops and overheating all greatly reduce the life expectancy of a drive.
The thing is, no one is truly safe from this, no matter how careful they are. What counts is what you do now. Keep calm, act fast, and you are already in a much better position to recover your files. There are many different reasons for data loss, and you can’t prevent every situation, but you can learn what to do in one.
Part 2: Why Acting Fast Matters in Mac File Recovery
Time is the most valuable resource you have when files are missing. Data that’s been deleted isn’t wiped from your disk right away. Instead, the space where it was is just marked as available for new data. It is usually still possible to recover until that space is overwritten.
That makes using your Mac normally after losing files risky. Saving a new file, opening an app, hell even loading a browser tab, any of it could wipe out the data you’re trying to save. The more you use that drive, the less likely you are to get everything back.
If you notice missing files, take these steps right away:
- Stop working on the affected drive immediately. Do not install new software or save new documents on it.
- Do not install recovery software on the same drive. If it’s your Mac’s startup drive, always download recovery tools on another drive. Downloading and installing on the affected drive risks overwriting the files you’re trying to save.
- Unplug external drives immediately. Do not connect any USB drive or external disk until you are ready to start the recovery properly.
This one habit can dramatically improve your chances of getting it all back. It’s not just helpful to move fast; it’s often the difference between success and permanent loss.
Part 3: When You Need to Start Mac File Recovery Immediately
Some warning signs mean you should begin recovery right away. Identifying these scenarios early can save you a lot of stress and lost data. The following are the most common situations requiring immediate action.
- Files disappeared after emptying the Trash: This is the most common cause of accidental data loss. When you empty the Trash, the files are no longer visible in Finder. However, the underlying data is often recoverable for a limited time.
- External drive or USB not showing data: Sometimes a drive is connected properly, but appears empty or inaccessible. This issue occurs due to corrupt file systems or damaged partition tables. Often the data is still there, just hidden from normal view.
- Mac system crash or sudden shutdown: An unexpected crash can interrupt the writing of files in progress. And can sometimes leave files incomplete, corrupted or temporarily inaccessible. The risk is greater if a forced restart happens during high disk activity.
- Disk shows as corrupted, RAW, or unreadable: If macOS doesn’t recognize the drive format, it may mark the drive as unreadable. That doesn’t mean your files are necessarily destroyed. Often, the file structure is corrupted, but the data itself remains intact.
- Accidental formatting or partition loss: Incorrectly formatting a drive is devastating, but it isn’t always permanent. Formatting, especially when it’s quick, often doesn’t touch the original data all that much underneath. In most cases, partition loss can be recovered by similar logic.
- Photos missing from Photos app or camera memory card: Camera cards and Photos library are common sources of accidental loss. A corrupted memory card can make a photo shoot look empty. Sometimes recovery software can read images directly from the card’s raw data.
The good news in all of these scenarios? Your data is probably still there. All you have to do is stop using the disk and take the proper steps to get it back. Use the drive normally, or wait too long, and your odds start dropping fast.
Part 4: How to Recover Lost Files on Mac (Step-by-Step Solutions)
There are several ways to approach Mac data recovery, ranging from simple to more advanced. Below are the three most effective methods, starting with the easiest.
Fix1: Trash
Check your Trash folder first before you try anything complicated. If you want to recover deleted files on Mac without much hassle, this is the fastest place to start. And often the deleted files sit there until the Trash is emptied. Open Finder, click Trash in the sidebar, and look for your missing files. If you find them, right-click and select “Put Back”. The file will be restored immediately to its original location. This method works only if you have not yet emptied the Trash.
Be sure to check not only the system trash, but also the app-specific trash bins. Photos, Mail, and some third-party apps each have their own separate deleted items folders.
Fix2: Time Machine
If you’ve been using Time Machine, you’re in a good spot. Time Machine automatically backs up your entire system regularly. Connect your Time Machine backup drive to your Mac to recover files—Open Time Machine from the menu bar or the Applications folder. Use the timeline to find a backup that was created before the data was lost. Find the missing files or folders, and click Restore. This method works perfectly fine, but only if you had backups enabled before. Sadly, many users think about backups only after a data loss.
Keep in mind that Time Machine backups only go back as far as your storage media will allow. The backup drive fills up, and older backups are automatically deleted.
Fix3: Professional recovery software.
When Trash and Time Machine aren’t options, dedicated Mac file recovery software becomes essential. Recovery software is especially useful for recovering files from deleted, corrupted, or formatted drives or partitions. Professional tools scan your storage device more deeply than Finder can. They find data that can be recovered and that is not available through normal file browsing.
4DDiG Mac Data Recovery
One of the best options here is 4DDiG Mac Data Recovery. It is specially designed to handle various scenarios of Mac data loss. Logical failures include accidental deletion, formatting, disk corruption, and system crashes.
Why 4DDiG is recommended:
It supports recovery from internal drives, external drives, USB sticks and SD cards. The software supports various file systems, including APFS, HFS+, and FAT32. It can retrieve a wide range of file types, including photos, videos, documents, and audio files. The preview feature lets you review the files that can be restored before the actual restoration. Filtering the scan results helps you avoid recovering unnecessary files and saves valuable time. The interface is simple and can be used even by non-technical users. It supports the latest versions of macOS and will run smoothly on modern systems.
It also addresses more complex cases that basic tools often do not. It includes data recovery from formatted drives, corrupted partitions and RAW disks. Even drives that won’t mount properly in Finder may still be scannable.
How to use it:
- Install 4DDiG from its official page. For security and reliability purposes, download the software directly from Tenorshare’s official 4DDiG Mac Data Recovery page.
- Choose the affected drive. Run the program and choose the specific disk or partition where your files were lost. It could be your internal Mac hard disk, an external hard disk, or a USB device.
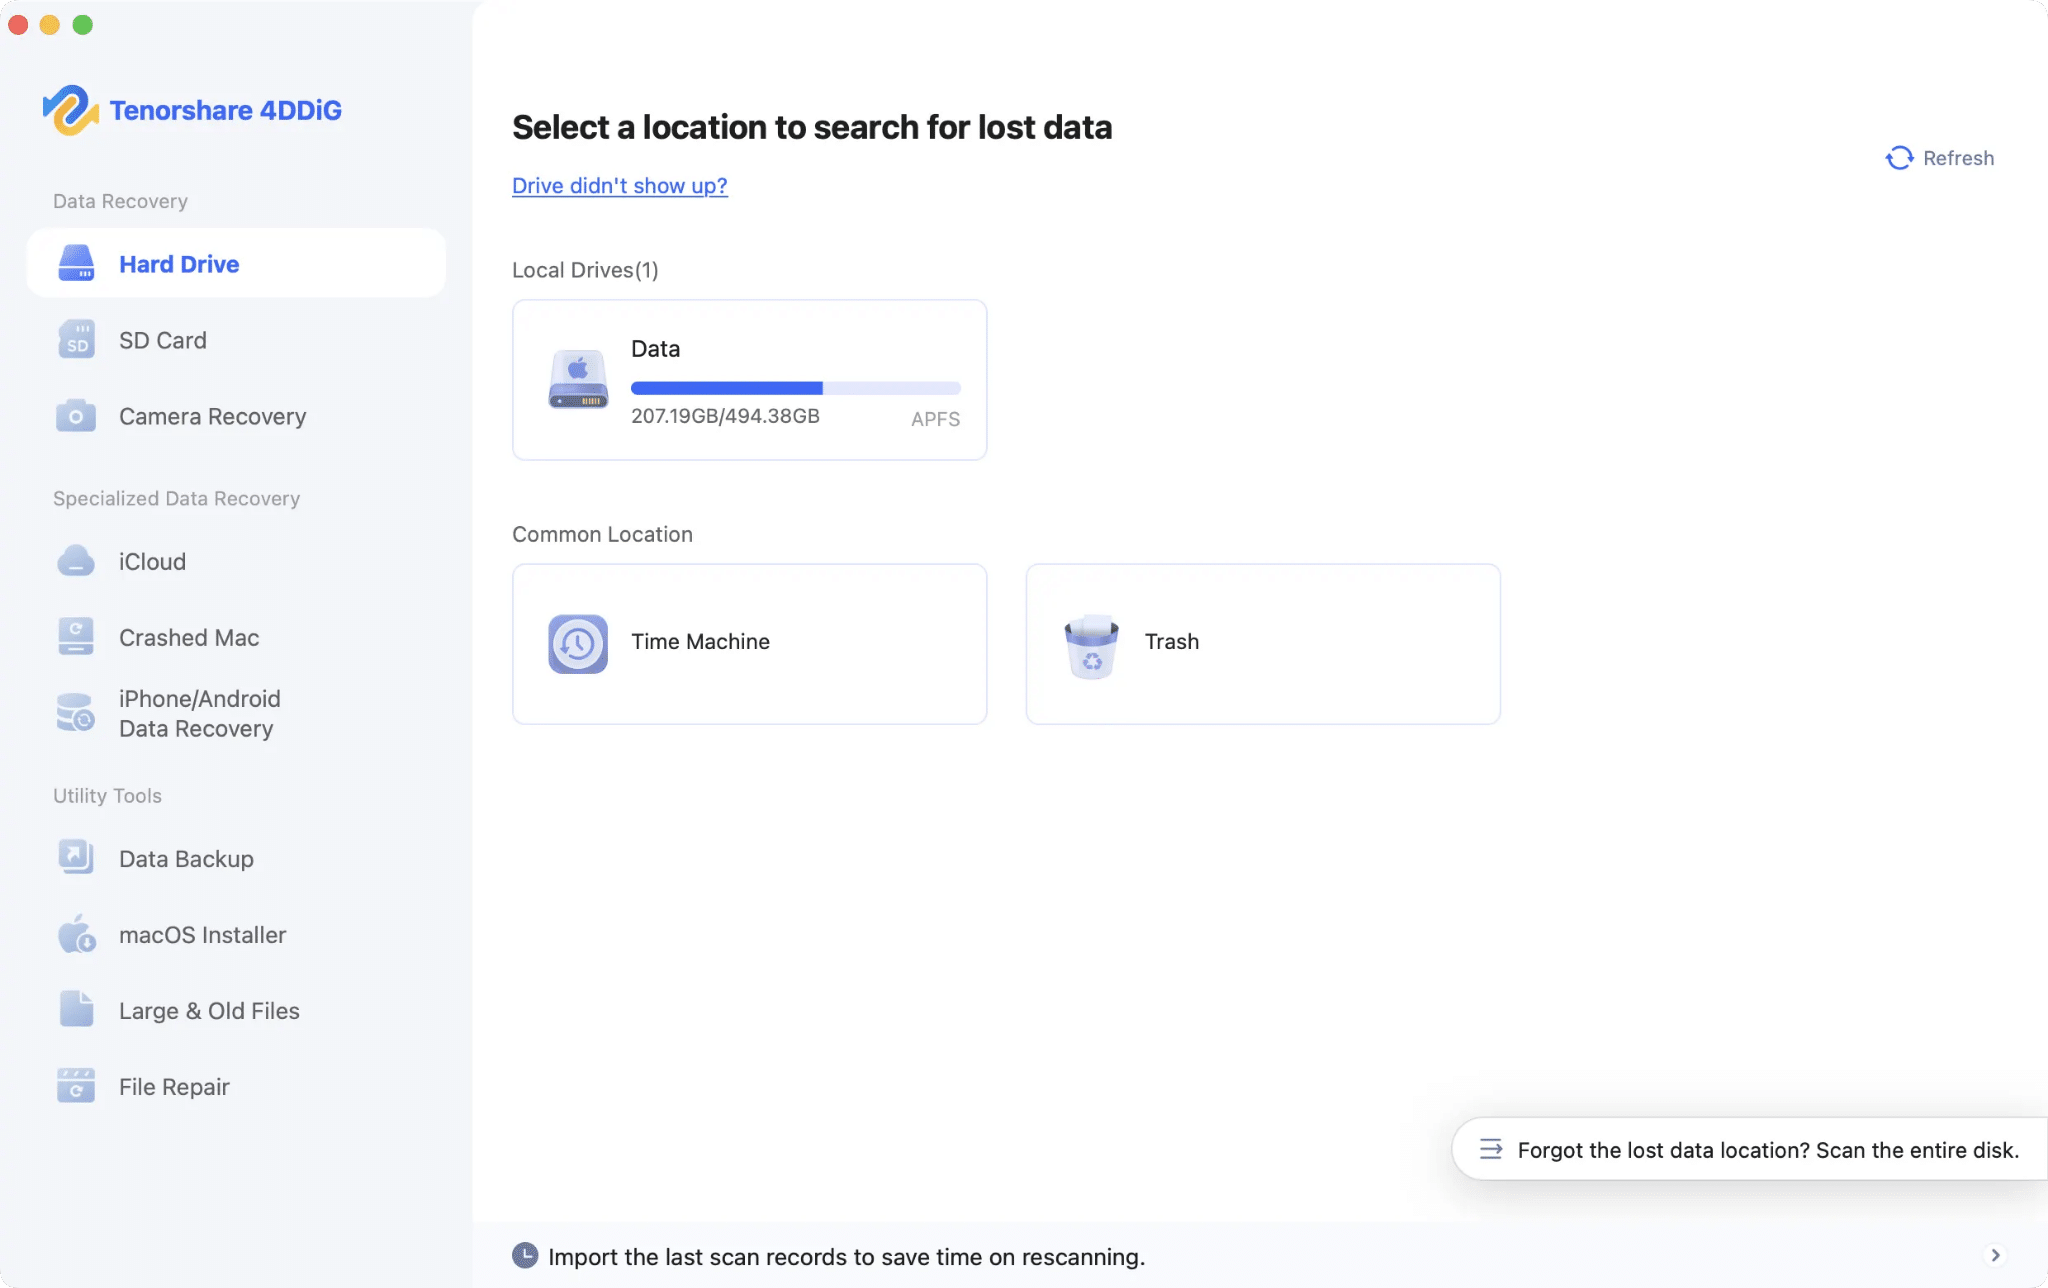
- Run a deep scan. Start the scanning process and let the software scan thoroughly for recoverable data. Deep scans are slower but discover a much greater number of recoverable files than quick scans.
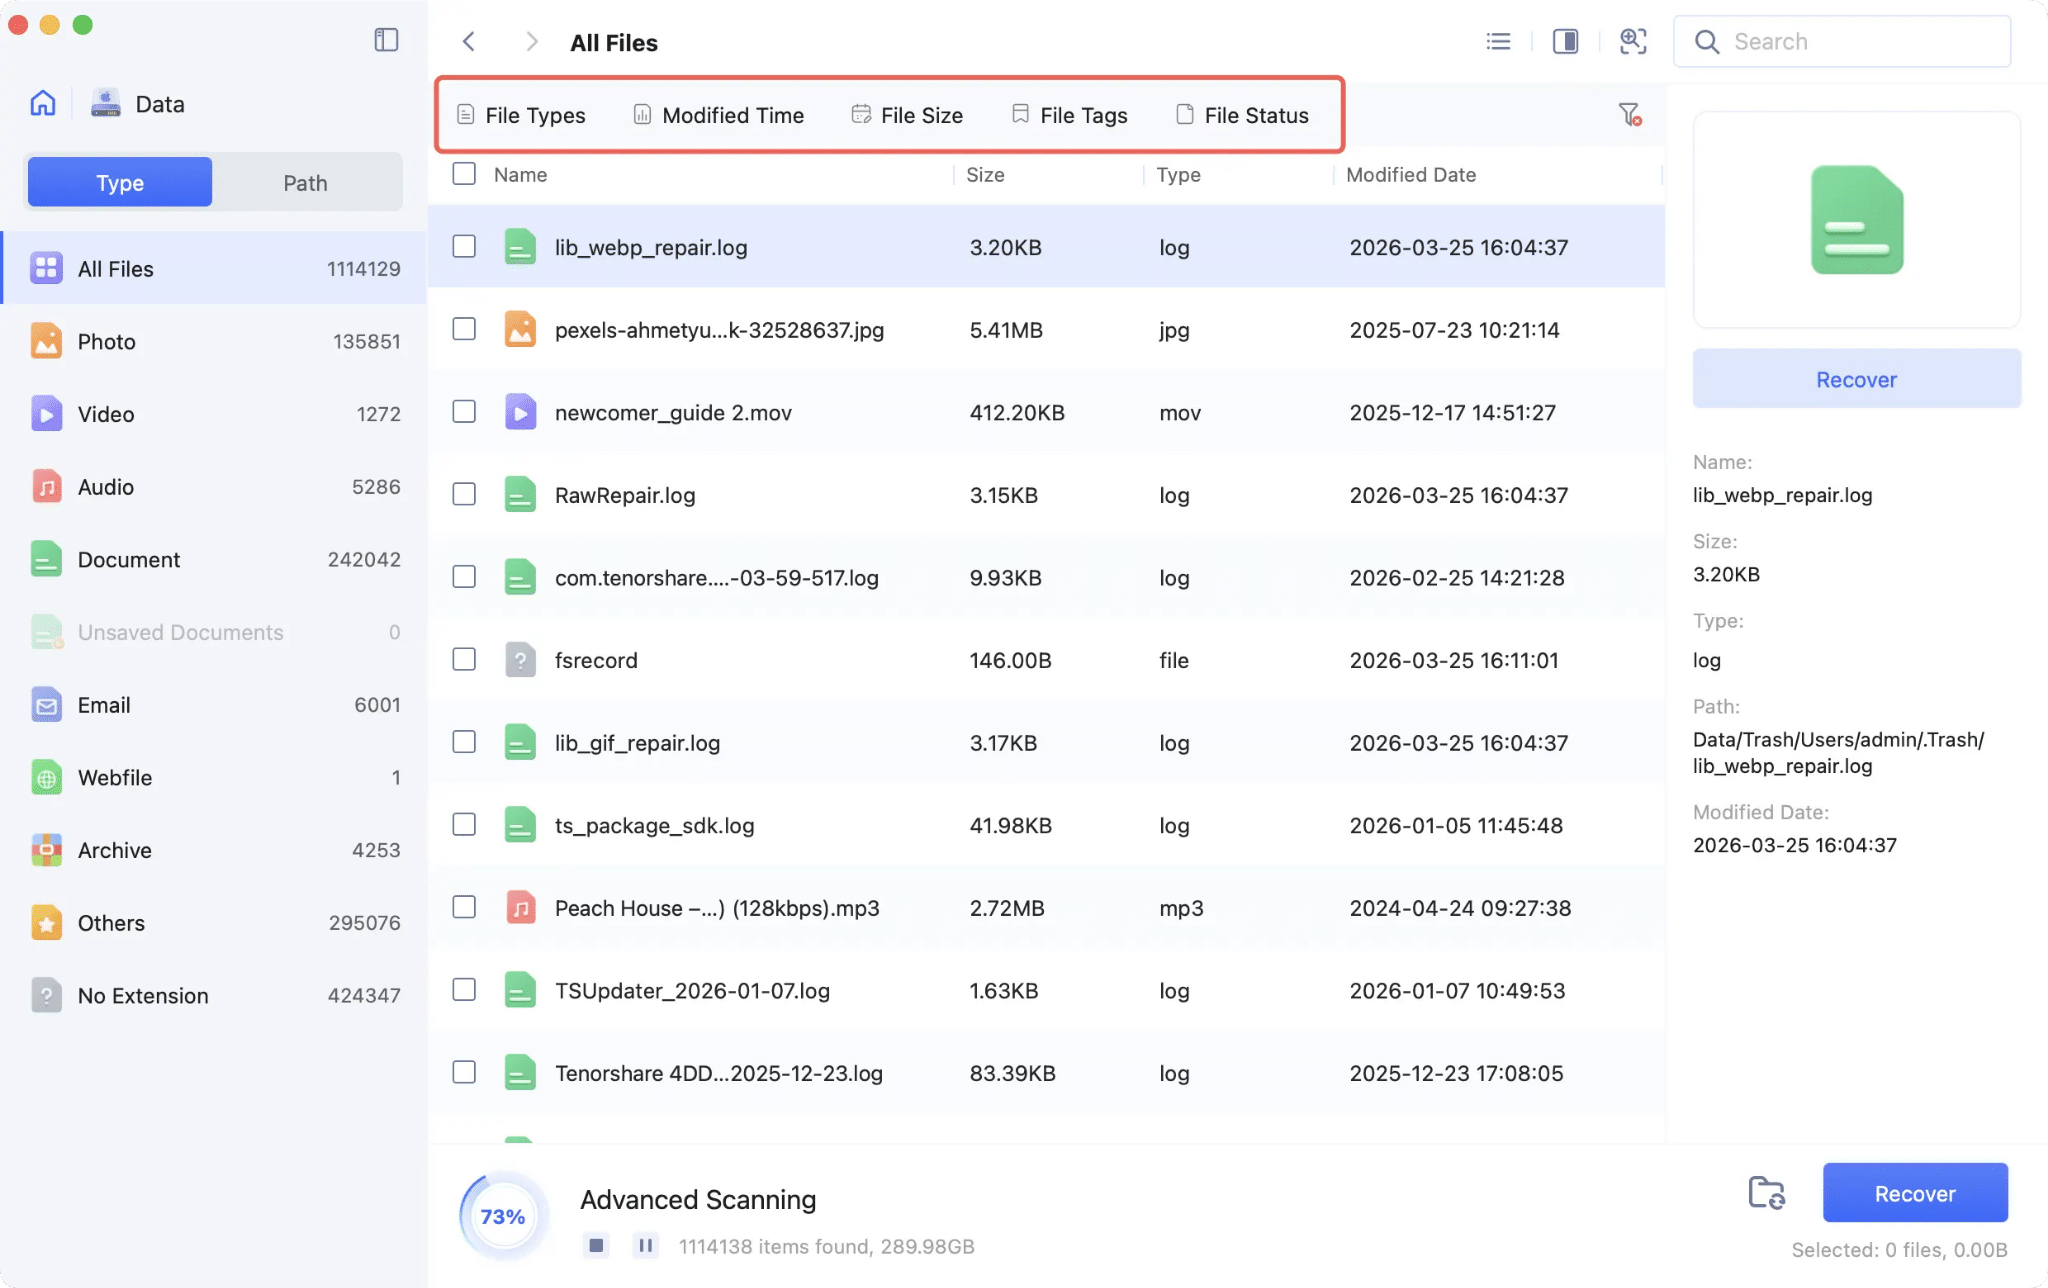
- Preview and recover. When the Scan is finished, you can view the results by file type or folder structure. Preview the files to ensure they are the files that you need. Choose the files you want and a safe place to save them. Do not restore files to the same drive from which you are restoring them.
This simple process makes professional-grade recovery available to everyday Mac users. Even if you’re not tech-savvy, the step-by-step instructions make it easy to follow. You can have your lost files back in your hands in minutes.
How long the Scan takes will depend on the size of the drives and the amount of data. For example, a small USB stick might finish scanning in minutes, but a large internal drive could take longer. Let the scan run, and you get the best picture of what is recoverable.
Part 5: How to Prevent Future Data Loss on Mac
Prevention really is better than a cure. Sure, a tool like 4DDiG can help you out when things go wrong. But it’s much less stressful to avoid the whole mess in the first place. Here are some habits to practise:
- Enable Time Machine: You set it up once, and your Mac backs up automatically after that. Get an external drive and use it solely for backups. That way, you’ll always have a recent restore point sitting there when you need it.
- Use cloud storage: ICloud, Google Drive, Dropbox, whatever you want to use, they all add a good extra layer of protection. If your Mac does die on you, your files are still there. And if something happens to your device physically, your data doesn’t go down with it.
- Always properly eject external drives: If you yank the drive without ejecting it, you’re just asking for corruption. Just pop out in Finder before you unplug anything. It takes two seconds, and it saves a surprising number of headaches.
- Avoid sudden power-offs: Don’t force your Mac to shut down when it’s writing or moving files. That’s a quick way to get some bad data. Things may seem frozen, but try the proper shutdown route first.
- Monitor drive health: Open Disk Utility occasionally and check your drives. If you get to a problem early enough, you can back things up before the drive keels over completely. Early action is even more important with older drives.
- Backup using the 3-2-1 rule: Make 3 copies of anything important. Two types of storage. One copy is stored elsewhere—perhaps in your original files, a Time Machine backup, or the cloud.
None of these habits alone is foolproof, but put them together, and you’re covering your bases. Look at this not as extra work, but as cheap insurance. You’ll be glad you have it when you really need it.
Final Words:
Mac data loss is stressful, but it’s rarely the end of the story. Most of the time, your files are recoverable if you act quickly and use the right method. Begin with basic checks, such as the Trash and Time Machine backups. If not, professional software such as 4DDiG Mac Data Recovery is a reliable option.
The bottom line: When you notice files are missing, stop using the drive they were on. Time and continued use are the biggest threats to a successful recovery. Knowing how to restore lost data from Mac hard drive issues means you’re never caught off guard, but better backup habits also protect you from future headaches altogether.
Data loss doesn’t equal data lost forever. Fortunately, with the right skills and tools, you can recover your files and get back to work with confidence.