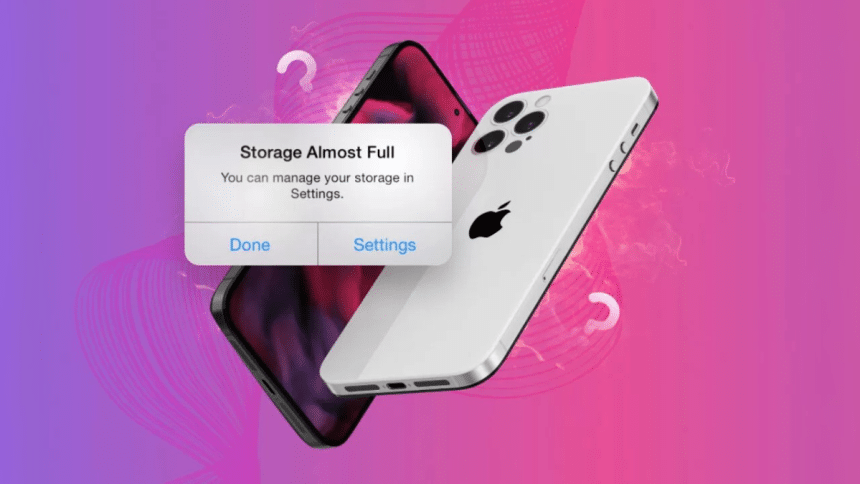
Your iPhone says storage is full again? Whether you’re on an older iPhone 11 with 64GB or a new iPhone 16 Pro Max with 512GB, this problem seems to follow Apple users everywhere. Apps get stuck, and things start slowing down.
Today, we’ll walk through why it happens, how to clear up space fast, and what actually helps long-term. These are the same steps we use ourselves, and we know they work.
Quick note before we start. Just to clear up a common mix-up. A lot of people search for ways to fix the iPhone memory full issue, when what they really mean is that the storage is full. Technically, memory (RAM) and storage are two different things. Memory is what your phone uses to keep apps running in the background. Storage is where your files, apps, photos, and videos live.
But in everyday use, people often use those terms interchangeably. If you’ve been googling how to fix low memory on iPhone, chances are you’re actually dealing with a storage issue. And that’s exactly what we’re going to help you fix here.
What Happens When iPhone Storage Is Full
When your iPhone runs out of storage, things stall.
- You’ll try to open the camera, and it won’t save the photo.
- Messages might fail to send if there’s a video or image attached.
- Some apps won’t open at all, or they’ll crash halfway through.
- Updates can’t be installed.
- Even everyday stuff like browsing or switching between apps starts to feel slower.
iOS does try to help. It clears out temporary files in the background. But once storage is fully packed, the system can’t breathe. There’s no room for new data, no space to cache, no buffer for apps to function smoothly.
The problem often builds up over time. Years of messages, media, browser cache, app leftovers, little things that quietly take up space until your phone hits the wall.
At that point, even small actions can fail, and you’ll get the alert. And unless you clear space, it won’t go away.
How to Fix iPhone Storage Full (Quick Fixes)
Okay, iPhone storage full what to do first? We’ll keep it simple and start with the quickest fixes first, nothing complicated here. You won’t need any special tools or extra cables. Just a few tweaks here and there, and a couple of minutes of your time.
Let’s start.
Method 1: Use an iPhone Cleaner App
It’s probably the easiest method on our list. If you’re short on time or just don’t feel like digging through your phone manually, try iPhone storage cleaner.
In most cases, the main culprit is Photos. It’s not even close. Especially if you’ve had your iPhone for a couple of years and take a lot of pictures or videos. Live Photos, 4K clips, duplicates, they pile up and eat through your storage. iPhone cleaner apps are great for this.
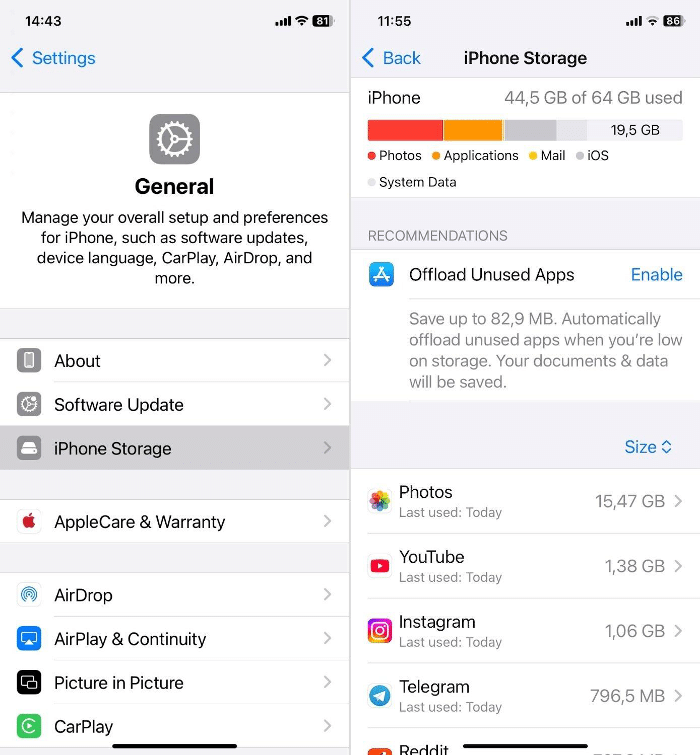
You can check this yourself. Go to Settings > General > iPhone Storage. Give it a second to load. You’ll probably see Photos right near the top of the list, alongside a few big apps like Messages or WhatsApp if you’re a heavy texter.
Cleaner apps help here by scanning your library and pointing out things you don’t really need.
We’ve tested quite a few of these. One of the better free options right now is Clever Cleaner: AI CleanUp App. It doesn’t spam you with ads, doesn’t lock any features behind a paywall, and actually does a good job at identifying what’s safe to remove (thanks to some smart AI algorithms).
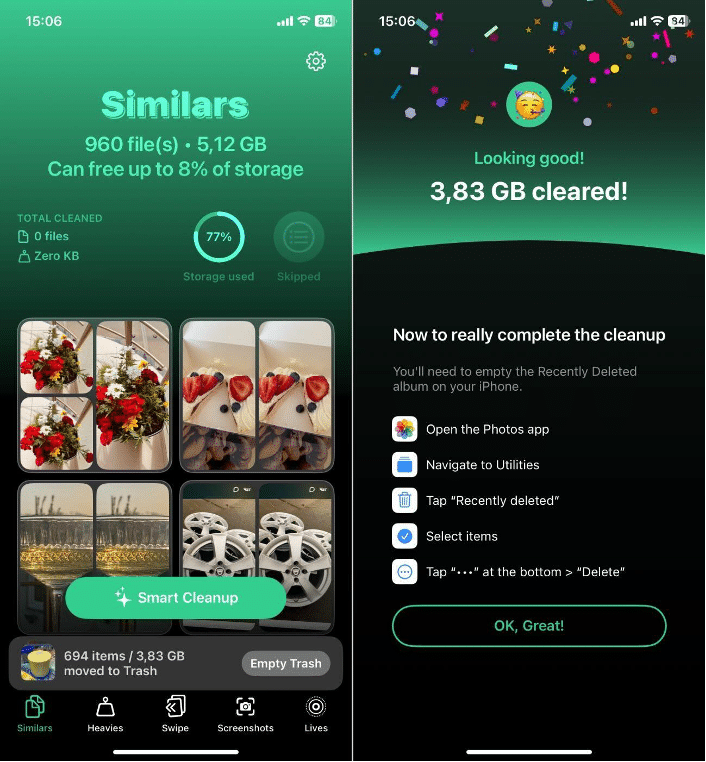
Here’s how you can, for example, clean up your library from similar images and duplicates:
- Once it’s installed, open the app and give it access to your photo library when prompted.
- Head to the Similars tab. This is where you’ll find both exact duplicates and photos that look nearly identical.
- Tap Smart Cleanup, and the app will scan your library using AI to figure out which images are worth keeping. It looks at things like sharpness, resolution, and overall composition to keep the best shot in each group.
- If you see any photos you want to keep, you can tap Restore to unmark them.
- When everything looks right, swipe the Slide to Delete bar and confirm. The app will remove the selected images.
- If you want, you can go through each group manually. Tap a group to see the photos, then either accept the app’s suggestion or pick the ones you’d rather keep. If you’re not ready to delete any of them, hit Skip All and move on.
- Once you’re done reviewing, tap Move to Trash. To finish up and free space immediately, go to the Photos app, open Recently Deleted, and clear it out. That’s what actually frees the space on your device.
The app is simple to use and pretty quick; give it a couple of seconds, and your iPhone can breathe again. But don’t forget, Similars is only one of the ways it helps clean things up. Clever Cleaner actually has a few more tricks up its sleeve:
- It can bulk-delete screenshots, so you don’t have to scroll through years of app instructions and Wi-Fi passwords.
- You can swipe through your photos one by one: left to delete, right to keep.
- It spots massive files (especially long videos) and lines them up by size so you can clear the biggest space hogs first.
- And if you’ve got a ton of Live Photos, it can convert them into regular stills, cutting the video portion and saving space without losing the image.
Method 2: Offload or Delete Apps
Next to Photos, apps are usually the second biggest storage hog on most iPhones. Especially the ones you haven’t opened in months, but that somehow take up 10GB each.
Sure, you probably know you can delete an app straight from your Home Screen. Press and hold, hit the Remove App, and it’s gone. But there’s a better way that gives you more info before you wipe anything.
Here’s how to remove apps when you get an “iPhone storage full” alert:
- Open Settings, go to General, then tap iPhone Storage.
- You’ll see all your apps listed by size, with the biggest ones right at the top.
- Tap any app to see how much space is taken up by the app itself versus the data it’s storing.
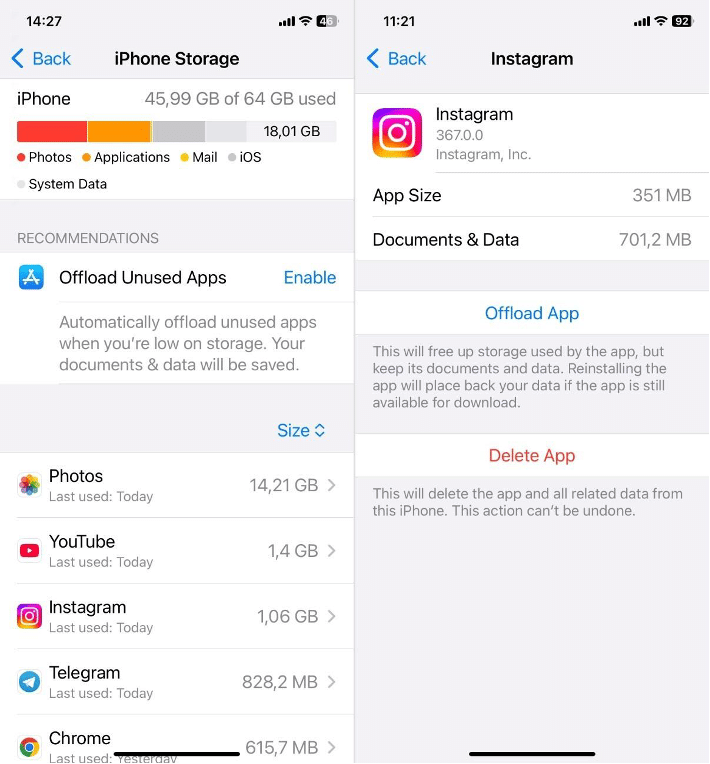
From there, you’ve got two options:
- Offload App keeps the app’s documents and data but removes the actual app from your phone. Later, if you reinstall it, everything picks up right where you left off.
- Delete App clears everything: the app and all of its data.
This one fix alone can make a big dent in your storage, especially if you’ve had your iPhone for a while and never cleaned up old apps.
Method 3: Optimize Photos with iCloud
This one will be great for those who want to keep all their photos but stop them from taking over the entire phone. If you’re not ready to delete anything but still need space, iCloud Photos with its built-in optimization feature can give you some breathing room without losing a single image.
Here’s how to activate it:
- Head to Settings > iCloud and turn on iCloud Photos.
- Then make sure Optimize iPhone Storage is selected. That second part is key. It tells your iPhone to store lighter, device-friendly versions of your photos locally while keeping the full-res originals in iCloud.
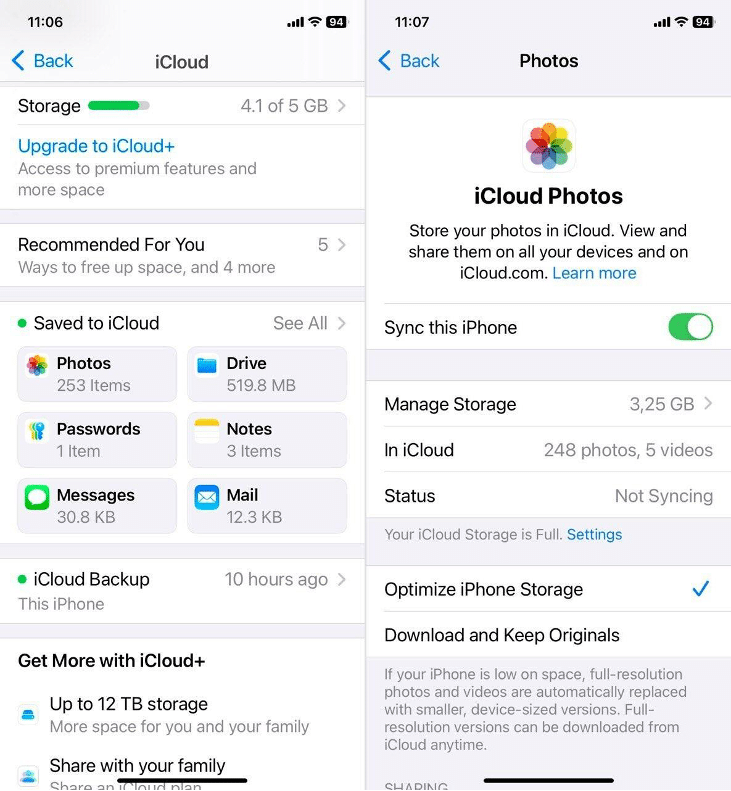
You’ll still see all your photos in the Photos app (nothing disappears), but behind the scenes, your phone is quietly swapping out full-size files for smaller versions when space gets tight.
Give it a bit to kick in. If your library is large, the process might take a few hours or longer, especially over slower Wi-Fi. Depending on your photo library, this can save you a huge amount of space. We’ve seen people free up 20GB or more without deleting a thing.
A couple of quick heads-up before you flip the switch:
- Once iCloud Photos is on, anything you delete from your iPhone also gets deleted from iCloud and any other devices synced to your account. If you want to keep something but not have it take up space, back it up somewhere else first.
- Also, you’ll probably need an iCloud+ subscription. The free 5GB plan fills up fast, especially if you’re syncing photos, messages, and backups. Most users end up needing at least the 50GB or 200GB tier. It’s not expensive, but it’s something to factor in.
Method 4: Clear Browser Cache and App Cache
Another area worth checking is cache. Cache is basically temporary data saved by your browser and apps to help them load faster. It’s useful in small amounts, but over time, it adds up.
Now, iOS should clear this data when storage gets low, and sometimes it does. But it’s not always reliable.
Start with your browser. Here’s how you can clear out the stuff it’s been holding onto:
- Go to Settings > Safari.
- Scroll down, and tap Clear History and Website Data. That wipes cached pages, images, and cookies.
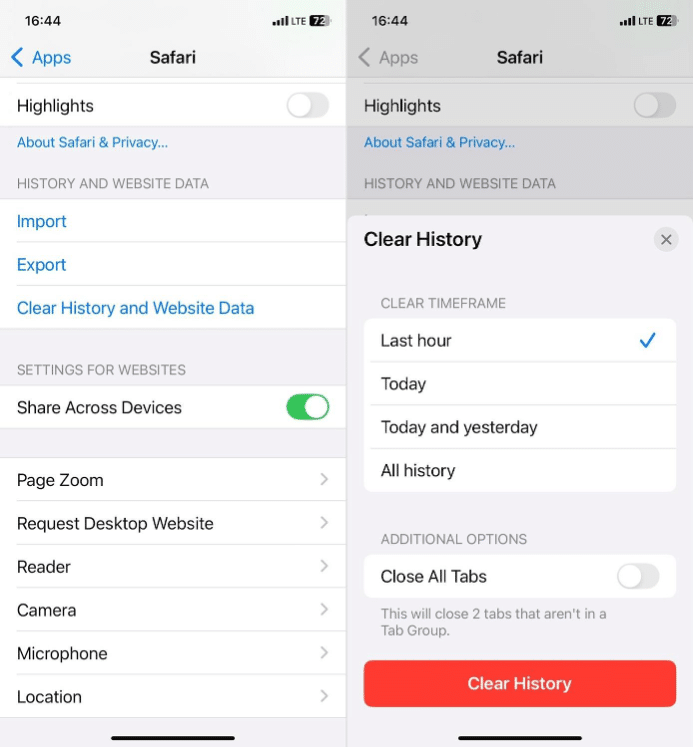
You’ll get logged out of websites, but it usually frees up space right away.
For other apps, it depends. Some, like WhatsApp, TikTok, and Telegram, have built-in tools to manage their own storage. You can clear cache or delete media directly from their settings menus. Others, like Facebook or Instagram, don’t offer much. In those cases, the best move is to delete the app and reinstall it. That’s the only way to clear out hidden downloads and bloated app cache.
Method 5: Remove Downloads
And the last one we’ve got is downloads. Do you know where stuff you download from the internet or receive through AirDrop usually ends up? Most people don’t.
Here’s how you can find it:
- Open the Files app and tap on Browse.
- Then go to On My iPhone.
- Inside, look for a Downloads folder, that’s where most Safari downloads and AirDropped files land. You might find videos, PDFs, ZIPs, or old project files you totally forgot about.
- If something looks familiar and you don’t need it anymore, go ahead and delete it.
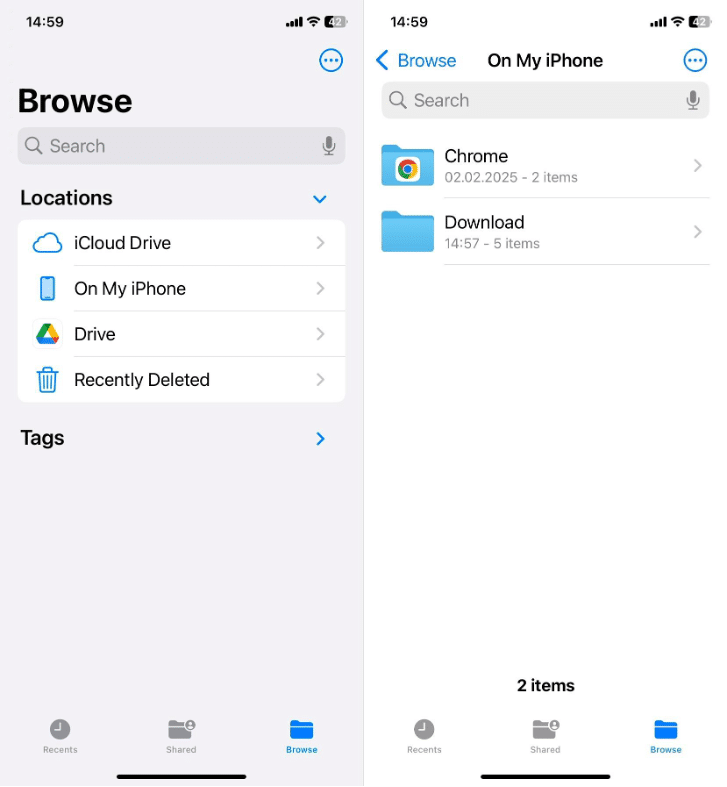
Also, check the Files app for folders created by apps like Adobe Scan, GarageBand, or any file-heavy tool you’ve used. They often store media or backup files locally without asking.
How to Prevent iPhone Storage from Filling Up
All these are usually the fastest and most effective ways to get your storage back under control. They don’t take long, and in most cases, you’ll see results right away.
But before we wrap this up, we wanted to mention a couple of other things worth keeping in mind if you’re looking for how to fix iPhone storage full for good.
- One: keep an eye on “System Data.” If you’ve tried everything and your storage is still weirdly full, there’s a good chance that logs, temporary files, or leftover cache from older apps are stuck in there. Sometimes, no matter how much you clear manually, that section refuses to shrink. One radical, but often effective, fix is to do a full backup and restore. It takes a bit more effort, but in many cases, it resets System Data and frees up space that nothing else could touch.
- Two: auto-delete old messages. If your iPhone has years of text history, especially with lots of media, you can simply go to Settings > Messages > Keep Messages and set it to 30 days or 1 year. iOS will handle the cleanup for you going forward.
- Three: you can tell your iPhone to offload apps automatically. We already talked about doing it manually, but there’s also a setting that lets iOS handle it in the background. Head to Settings > App Store and turn on Offload Unused Apps. When your storage starts running low, your iPhone will quietly remove apps you haven’t used in a while. Not everyone loves this feature. Some find it too unpredictable, but it’s worth knowing the option exists.
- Also, it’s not only iCloud, you’ve got other cloud storage options too. If you’re running out of space and don’t want to upgrade your iCloud plan, apps like Google Photos, Dropbox, or OneDrive can all help offload your files.
Final Thoughts
In most cases, the steps we’ve covered here will help you forget all about those “iPhone Storage Full” alerts. Clear out what you don’t need, offload the stuff you rarely use, and let smart tools handle the rest.
That said, it’s still a good idea to check your iPhone storage every now and then. Open iPhone Storage, scroll through the list, and see what’s growing. It only takes a minute.
And if you really want to stay ahead of the clutter, give an iPhone cleaner app a spin once a month. It’s a quick way to stay organized without having to dig through everything manually.
A little cleanup now and then makes a big difference.


